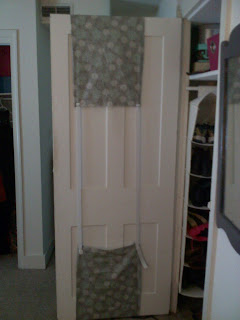
Got a boring closet door, or two or three? I do. And in a white room with white doors, I was looking for any surface to which I could add some color. So why not dress up the space where you play dress up? Let's re-do those closet doors.
What I'm Working with:
 |
| White, Boring, Folding Door. Boo. |
1.Fabric of choice 2.Scissors 3.Ruler 4.Elastic Band 5.Iron 6.Fasteners
What You're Gonna Do:1. Measure - To give you an idea of how I went about this most important step, my door is made up of two panels that measure 1'6" wide by 6' tall by 2" thick. I needed enough to cover these dimensions on the front side, wrap over and then have an extra 2' on the top and bottom of the back of the door. So that's 6' (front length)+ 4" (thickness of door on top and bottom)+ 4' (back length) for the length of the cut fabric, 10'4". Then 1'6" (front width) + 4" (seam allowance on either side) for the width of the cut fabric, 1'10". Lastly, measure elastic bands into (2) 1.5' pieces.
2. Cut - I cut my fabric accordingly. I have to cut these pieces twice since I have a folding door. If you are doing a traditional, single panel door, you obviously only do this measurement and cut once. If this is hard to understand, I totally can see why. Just scroll down and once you see the pictures and it will make way more sense, I promise. Go ahead, Scroll down.
3. Iron - To make sure your fabric will have a smooth edge on your door, it is necessary to create a hem to prevent fraying especially when you will be swinging that door open and closed. With my fabric cut with a seam allowance of 2" on each side I have room to create a clean edge simply using a fold and an iron. If you have the energy you can go a step further and use your sewing machine to create an actual hem along the entire length of the fabric, totally up to you.
Measure.
Fold.
Iron.
4. Wrap - Throw one end of your fabric over the door and pull the other end under it. Using your fasteners, attach the elastic to one end of the fabric. Stretch the elastic to attach to the other end. If you are not stretching the elastic, it is too long. You need the tension to keep the fabric taunt on the door. This stretch also allows the option to remove the fabric in the case that it needs to be washed. My doors are on tracks so I have to use heavy-duty safety pins to attach the elastic as there is no way to slide the fabric over the door. I also added slits in the fabric where the track attaches to the door. It is hard to photograph this part but its pretty obvious where you need to snip the fabric in order for it to lay flat. If you are wrapping a traditional door you can sew the elastic to your fabric ends and then slip it right on. Also trim the fabric to allow for door pull. I simply removed my door pull (which was screwed into the door), poked a hole through the fabric and then reattached the pull. Traditional door knobs can also be removed and a larger hole can be made then re-covered by hardware.
 Attach.
(obviously this is not my project door, this is just easier to see)
5. Stand Back and Enjoy
Despite the long, elaborate discription for this project, it really is quite easy once you figure out your measurements. Pick your fabric, cut it, hem it, elactic it and wrap it. It is such a great way to add a little flair to your room without any permanent damage. Pick a different fabric for each door in your room or your house or change it with every season or every mood. Fabulous, if I do say so myself. What do you think?
Until Next Time..
Keep your eyes on the sky.
<3 ray
Igot-it@: Fabric, Joann Fabric. Elastic, Joann Fabric.
Clickit!:


No comments:
Post a Comment