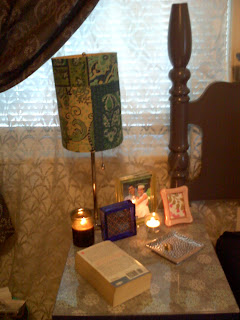
Thursday, August 30, 2012

Closet Door Re-Do

Hello Friends.

Got a boring closet door, or two or three? I do. And in a white room with white doors, I was looking for any surface to which I could add some color. So why not dress up the space where you play dress up? Let's re-do those closet doors.

What I'm Working with:

White, Boring, Folding Door. Boo.
What You Need to be Working with:

 
1.Fabric of choice 2.Scissors 3.Ruler 4.Elastic Band 5.Iron 6.Fasteners
 

What You're Gonna Do:

1. Measure - To give you an idea of how I went about this most important step, my door is made up of two panels that measure 1'6" wide by 6' tall by 2" thick. I needed enough to cover these dimensions on the front side, wrap over and then have an extra 2' on the top and bottom of the back of the door. So that's 6' (front length)+ 4" (thickness of door on top and bottom)+ 4' (back length) for the length of the cut fabric, 10'4". Then 1'6" (front width) + 4" (seam allowance on either side) for the width of the cut fabric, 1'10". Lastly, measure elastic bands into (2) 1.5' pieces.

2. Cut - I cut my fabric accordingly. I have to cut these pieces twice since I have a folding door. If you are doing a traditional, single panel door, you obviously only do this measurement and cut once. If this is hard to understand, I totally can see why. Just scroll down and once you see the pictures and it will make way more sense, I promise. Go ahead, Scroll down.

3. Iron - To make sure your fabric will have a smooth edge on your door, it is necessary to create a hem to prevent fraying especially when you will be swinging that door open and closed. With my fabric cut with a seam allowance of 2" on each side I have room to create a clean edge simply using a fold and an iron. If you have the energy you can go a step further and use your sewing machine to create an actual hem along the entire length of the fabric, totally up to you.

 Measure.

 
Fold.
Iron.
 

4. Wrap - Throw one end of your fabric over the door and pull the other end under it. Using your fasteners, attach the elastic to one end of the fabric. Stretch the elastic to attach to the other end. If you are not stretching the elastic, it is too long. You need the tension to keep the fabric taunt on the door. This stretch also allows the option to remove the fabric in the case that it needs to be washed. My doors are on tracks so I have to use heavy-duty safety pins to attach the elastic as there is no way to slide the fabric over the door. I also added slits in the fabric where the track attaches to the door. It is hard to photograph this part but its pretty obvious where you need to snip the fabric in order for it to lay flat. If you are wrapping a traditional door you can sew the elastic to your fabric ends and then slip it right on. Also trim the fabric to allow for door pull. I simply removed my door pull (which was screwed into the door), poked a hole through the fabric and then reattached the pull. Traditional door knobs can also be removed and a larger hole can be made then re-covered by hardware.
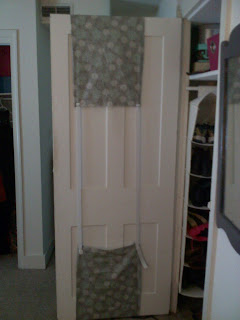
 
Attach.
 (obviously this is not my project door, this is just easier to see)


5. Stand Back and Enjoy

You Did It!

Despite the long, elaborate discription for this project, it really is quite easy once you figure out your measurements. Pick your fabric, cut it, hem it, elactic it and wrap it. It is such a great way to add a little flair to your room without any permanent damage. Pick a different fabric for each door in your room or your house or change it with every season or every mood. Fabulous, if I do say so myself. What do you think?

Until Next Time..
 
Keep your eyes on the sky.
<3 ray
 
 
Igot-it@: Fabric, Joann Fabric. Elastic, Joann Fabric.
 
Clickit!:


BedSide Table Rehab

Hello Friends.

It's the first thing you see in the morning, and the last thing you see at night. No, it's not your lover's (or your cat's) face. It's your bed side table! It lovingly holds all of your bedtime needs but sometimes it needs some love in return. So let's update that dull wood number you have resting next to your bed where you are resting your head. All you need is some paint, plexi-glass, fabric and time.

What I am working with:


Your run-of-the-mill, boring, Ikea MALM chest with two drawers

 
Now if you have ever attempted to paint a piece of Ikea furniture, you know what a pain it is to keep anything from scratching off the "particleboard, birch veneer, clear acrylic lacquer" surface. If you have not attempted to do so, DON'T, unless you have a lot of time, energy and patience. This ended up a multi-step process that really fried my nerves, once I figured out how to keep the paint on the damn thing, you can see the hard work paid off. Here is what you do:

1. Prep Surface- Clean the outer surfaces with mild cleaner and paper towels, dry completely. You may also opt to sand the entire surface of your bedside table but it depends on the type of finish your table has, the MALM was nearly un-sandable, so i didn't waste my energy. That is one tough clear acrylic lacquer.
2. Paint- I used Behr Premium Plus Ultra Paint & Primer In One in "Signature Blue". I applied this with a sponge roller, two coats, dry completely.

Don't touch!
 
3.  Seal that B****- Apply MinWax Fast-Drying Polyurethane Clear Semi-Gloss with a sponge roller, two-three coats, dry completely.
 
 Shiny!
 
 
4. Pick your Textile- Select a fabric in a complementary color and/or a fun pattern. This is where you make this table yours! Cut fabric to the dimensions of the top of your table.
 
Pretty.
 

5. Cut Plexi-Glass Top- I admit I had a little help from my Handy-Daddy, but if you have access to a table saw or jig saw or know someone who does, cut a sheet of plexi-glass to the dimensions of your table top. This step requires the most effort but it is also the most important as it will protect your table top and fabric and makes your bed side table more durable and water proof.
 
6. Assemble- Put your bedside table in its desired location, place fabric on top of table top and plexi-glass on top of that.
 
 Ta-da!
 

7. Accessorize- Fill that beauty with all the things you need for bed time and top it with essential bedside table lamp as well as frames, candles, your favorite book, whatever makes it yours!
 
 That's it!
 

Now wasn't that easy? This project can be done in any number of variations. Be creative! And of course the fabric topped table does not have to be unique to bedside tables. It can be used on desks, dressers, living room side tables, counter tops and vanities. The fabric and plexi-glass combination is an inexpensive way to vamp up any flat surface. Give it a try!
 
More to come...
Until next time...
 
Keep your eyes on the sky.
<3 ray
 
 Igot-it@: MALM chest with two drawers, Ikea. Behr paint, Home Depot. MinWax Polyurethane, Home Depot. Fabric, Joann Fabrics. Plexi-glass, Home Depot.
 
Clickit!:
 

New Room Remodel


Hello Friends!

I have recently moved into a new apartment in the lovely, up and coming Brewerytown neighborhood of Philadelphia. While my arms nearly fell off and I inhaled so much dust I think my lungs may hate me, I have to admit I love moving for the chance to design and decorate a new space. Of course, as a renter, there are some limitations to what i can and cannot do to alter the space. Unfortunately, painting is not permitted and excessive holes in the walls must be avoided. So I decided to utilize furniture and textiles to enhance the room. So the next few tutorials are some of the projects I did to transform a bland room into a comfortable escape. Here is what I am working with...

THE BEFORE:


Stay Tuned for My Remodel Magic
 
Keep your eyes on the sky.
<3 ray


Wednesday, August 8, 2012

HELLO Friends...New and Old.


Welcome! This is my first post. As I did not plan ahead to create a post on a newly created topic, here's a little number on some old stuff (literally).


VINTAGE
 
And Who doesn't love VINTAGE?!

Here are some great 'Flea Market Finds' that I ventured into the sweltering summer heat to discover. I think it was worth it...


Aztec Inspired Eagle Necklace, Silver with Turquoise
A Great Summer Accessory, I have already worn it a million times.

Love this! The pleating and tulip hem are great details.

Gotta love the polka dots. And Navy is a great color for every season. Pair it with a nude lace top to match the color of the dots, a nude heel and some gold and navy earrings in the Spring/Summer or a cozy cream sweater in the Fall/Winter.


You must have a Leather Pencil Skirt in your collection, duh!

The waist band on this baby really cinches in your waist line and looks great on anyone.


Show off you tush in this figure hugging skirt and add a flowy, printed blouse, studded earrings and either killer heels or motorcycle boots for a fun night out. Get sexy at work wearing the skirt with a sheer, light colored blouse under a fitted blazer.


I love vintage scarves, I have been collecting them for years.


I have so many, my scarf bin literally overflows.
Scarves are a great way to accent and enhance your wardrobe. I look for them everywhere, from flea markets to consignment shops, to grandma's house and lost and founds. Seriously. Dress up any look with a fun variety of color, pattern and fabric. Tired of trying to dress up at work, I went a whole week wearing the same black pencil skirt and white T-shirt with a different scarf everyday and no one was the wiser. Try It For Yourself! 

Tune in later for more fun with my scarf collection.


Some other great vintage items you will find around my apartment....


Keep an eye out at your local consignment and thrift stores for great pieces for your home. Or check out bidding websites that offer vintage items. Did you know Goodwill has an auction site with a similar premise to Ebay? Take a gander at http://www.shopgoodwill.com . The auction has access to sellers all over the world, and their proceeds fund job placement and education.

Vintage is all around my friends. Out with the Old and In with the New? How about we hold on to both?

Keep your eyes on the sky.
<3 ray


Igot-it@: Eagle Necklace and Polka-Dot Skirt, Traveling Flea Market, Philadelphia. Nude Lace Top, Express (circa 2006. Nude Heel, ShopRuche.com. Gold Enamel Earrings, Green Street Consignment, Philadelphia. Leather Skirt, Retrospect, Philadelphia. Black Feather Blouse, Target (circa 2011). Scarves, Various Stores, Mainly in New Hope, PA. Jewelry Chest, Aids Thrift, Philadelphia. Globe, Ebay. Framed Vintage Lace, handmade. Chair, Belgium. Serving Tray (part of set of two), Goodwill.


Clickit!: 
http://www.retrospectvintage.com/
http://www.target.com/
phillyaidsthrift.com/
ebay.com
http://www.shopgoodwill.com
http://light-andsweet.blogspot.com/